Author Archives: Lisa

Behind Cambridge Mask Filter Technology

Cambridge Masks filter air through three different layers . . .

Cambridge Mask Face Mask

1. The Primary Filter Layer

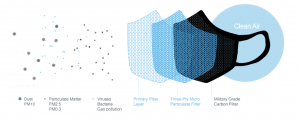
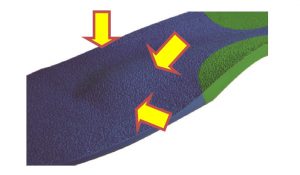
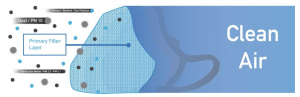
The first layer of the Cambridge Mask filters out larger particles such as dust and PM10. The material is sublimation printed in different patterns to make the masks fashion friendly.

Cambridge Masks

2. The Three-Ply Micro Particulate Layer

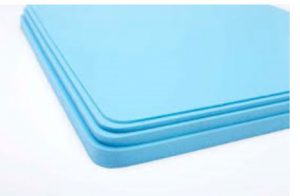
The second layer of the mask blocks particulates such as PM2.5. It also filters 99.79%+ of particles as small as PM0.3. The textile is a three-ply non-woven melt-blow polypropylene, a thermoplastic polymer used in a range of applications.

The blow moulding process begins with melting down the polymer and forming it into a “parison” – a ball of liquid. High velocity air is then passed through to attenuate the filaments and create a fibrous web. The random fibre orientation this triggers is advantageous because it creates a better mesh to trap particles. The textile is also created with a high surface area, meaning a greater percentage of particulates are captured as they pass through the filter.

Cambridge Mask

3. Military Grade Carbon Filter

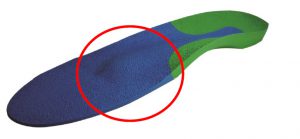
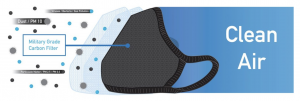
The Cambridge Mask Pro is completed with the inner filter which is made from a 100% pure activated carbon cloth, which was originally invented by the UK Ministry of Defence. It was then extensively developed and made into a product for use in chemical, biological and nuclear warfare protection, of the type used by armed forces around the world. We hold the exclusive global rights for this material for use in a consumer pollution mask. You won’t find it in any other mask outside of the military.

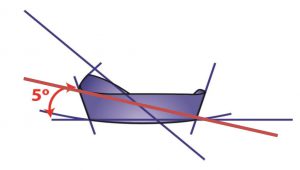
All activated carbons – traditionally powders and granules – generate “Van der Waal” forces due to their porous structure. These forces give activated carbons their unique potential to adsorb gaseous molecules, including anions and cations into their internal pores.

Cambridge Mask

Our filter material is comprised of a series of activated carbon filaments, each about 2,000 nanometres in diameter. Each filament is many times smaller than the typical grain size in standard carbon materials, making the rate of adsorption of pollutant gas much faster and therefore more powerful. It also means that bacteria and viruses are drawn to the filament surface much more efficiently, because there is so much more available surface than in a granular carbon.

The high number of filaments – spun into a yarn and then woven into cloth – makes the speed of adsorption extremely fast in a material that is still easy to breathe through. Not only are molecules such as pollutant gases and endotoxins quickly adsorbed into the pores from a much wider area, but the Van der Waals forces also attract and immobilise on the filament surface much larger particles including bacteria, which often have a negatively charged membrane. Together with the anti-bacterial silver added to the filament surface, the activated carbon cloth traps the bacteria and draws out the gel-like cytoplasm inside – killing it and preventing infection.

Cambridge Masks are therefore powerful respirators that not only clear the air of pollution via the particulate filter, but also remove potentially harmful gases and pathogens with the additional carbon filter.

Cambridge Face Mask

VIEW CAMBRIDGE MASKS

Cambridge Mask – Your questions are answered here.

Cambridge Mask face Mask

Cambridge Mask Face Mask

What products do you have?

We currently have the PRO Cambridge Mask, which is available in 5 sizes to fit children and adults. We also provide a head-strap and nose foam to help the masks fit better.
The PRO Cambridge Mask is made by combining 3 unique layers; the outer printed layer, the three-ply particulate filter, and an activated carbon cloth which is tested British Military Filtration Technology and filters almost 100% of pollution, gases, 99.6% of viruses and 99.7% of bacteria. The PRO mask is also treated with silver to protect the wearer against bacteria and viruses. PRO masks have a  lifespan of up to 340 hours of use.

Cambridge Mask Face Mask


How long can the mask be used for?

Cambridge Masks are non-disposable and can be used up to 340 hours. The length of time is affected by the level of pollution/dust. A table is provided below:

Cambridge Mask Face Mask

Please note that the mask can be hand washed with soap and hot water. However, this will not extend the life of the filters as the pollution will be locked into them. The mask will need replacing after extended use to ensure proper filtration

What does the valve do?

The valve works by opening when you exhale and closing when you inhale. The easiest way to see this in operation would be to look in the mirror and observe it opening and closing as you breathe.

We have made improvements to the valve to adjust the thickness of the inner membrane. This makes it easier for the valve to open and close at the exact time you are exhaling and inhaling.


Filter Technology – What does the Mask Filter?

Almost 100% of Particulate Matter (PM) including PM10, PM2.5 and PM0.3. These are the sort of particles you find in coal dust from power stations, diesel exhaust fumes, factory emissions, and from construction works.

• Almost 100% of gas based air pollution, including odours such as Volatile Organic Compounds (VOCs), Ozone, Benzathine, and Formaldehyde. These particulates you can find in petrol fumes, chemical emissions, and from many industrial processes.

• Almost 100% of harmful pathogens such as viruses and bacteria. 

• Other airborne irritants or allergens such as dust, mould spores, some odours, pet allergens and pollen.


Who is the Mask for?

• Anyone exposed to Viruses. Viruses usually travel on droplets of water, which are very large. The mask will block these particles. The Cambridge Mask PRO filters are treated with silver, which works to enhance the anti-viral properties of the technology.

• Anyone seeking protection for airborne irritants such as dust and mould

• People in at risk groups for respiratory disease, including children, elderly, pregnant women and those with existing respiratory conditions.

 Asthmatics and allergy sufferers including Hay Fever. 

 Hobbyists and DIY such as woodworking and sanding.

• Anyone exposed to urban environments with high air pollution levels – any big city often has higher air pollution.


Couldn’t find your question here?

Please ask in our blog for more information. Thanks

Coming clean about sanitisers

There is a high level of confusion about which sanitising products are effective against the Coronavirus. Using any sanitiser is a good thing, but many are no more effective than a thorough hand wash with hot water and soap.

For example antibacterial sanitisers are only effective against bacteria, not viruses. Antimicrobial sanitisers however act against a range of micro-organisms including bacteria, fungi and viruses.

Alcohol is one of the lesser effective chemistries and has to be used in concentrations of at least 70% in order to be effective. Many alcohol sanitisers contain far lower concentrations than this.

The antimicrobial effectiveness of Clinisept+ has been vigorously and independently tested, proving it to exceed the recognised levels of performance required of this type of product.

Clinisept kills coronavirus

Clinisept+ Aftercare 100ml Trade £5.15 + VAT

Clinisept kills coronavirus

Clinisept+ 250ml Trade: £5.50 + VAT

Clinisept+ kils coronavirus

Clinisept+ 500ml Trade £6.50 + VAT


Clinisept+ can be sprayed liberally directly onto the hands, face and surfaces to provide rapid protection against contamination.

Clinisept+ contains a proprietary ultra-pure hypochlorous solution which enables it to provide effective cleansing at a fraction of the strength of traditional cleansing chemistries.

Clinisept+’s hypochlorous has a unique oxidising method of action which cleanses and provides antimicrobial protection but is also completely skin safe. It doesn’t harm, irritate or sensitise the dermal layer. And because of the product’s oxidising method of action, organisms cannot become immune to it, meaning it is not subject to anti microbial resistance.

The chemistry has undergone extensive independent testing proving not only its extreme effectiveness, but also the fact that it has a skin neutral pH, is hypoallergenic and is even non-cytotoxic. (Not toxic to cells.)

Clinisept+ truly is the holy grail of skin cleansing. The reason Covid-19 is so serious is that the virus is both resilient (there is no vaccine) and also virulent, which is why it has spread so quickly around the world.

The speed with which a virus spreads is measured by its ‘reproductive number’, or R, which in layman’s terms, is the number of people that one individual with the virus will infect. If the number is greater than one, then the infection is spreading. If it is less than one, then it is in decline.

Recent estimates have put the R index at 2.5, however it has reached well over 3 in China and Italy. This means that every person that has Covid-19 transmits it to two or three others.

Covid-19 is therefore growing exponentially and is not going away anytime soon.

To beat coronavirus, we have to get the R number down, to below 1.0. So how can we achieve this? There are four key aspects that influence the R: the duration that someone who has the virus is infectious for, the number of people an infected person comes into contact with whilst they are contagious,

whether the contact is sufficient for transfer of the virus to take place, and the susceptibility of the people who become exposed to it.

Because we don’t have any medicines or vaccines that are effective against Covid-19, we can’t do anything about the length of time someone is infectious and neither can we change how susceptible we each are to the virus, and as we know the elderly or those with respiratory conditions are far more susceptible.

However, we clearly can influence how much contact we have with other people and therefore how much we expose ourselves to the danger of becoming infected.

Put simply, if you don’t come into close contact with someone who has the virus and you don’t touch a surface that has been contaminated with it, you will not become infected.

Completely avoiding contact with other people and the surfaces they have touched is almost impossible, so frequent hand washing and sanitising with an effective chemistry is essential. Evidence of Clinisept+’s effectiveness has been presented to HSE and the Government and a submission has been made for fast-track approval as a skin disinfectant for use during the current pandemic.


Achilles Pain

ICB Lower limb biomechanics

Achilles pain can apply to a number of conditions that impact upon the Achilles tendon area. Generally most surgeons refer to any condition that elicits pain in the area of the Achilles attachment as Achilles tendonitis. Specifically, the makeup of the word is, ‘tendon’ meaning tendon and – ‘itis’ – a suffix used in pathological terms that denote inflammation with its origin being from the Latin language.

View ICB Products

Different professions have sort to be more specific in the description of the condition and thereby more closely define this area of pain to design better treatment regimes. Terms such as Achilles tendinopathy, tenopathy, tendinosis, partial rupture, paratenonitis, tenosynovitis, tendovaginitis, peritendinitis, and achillodynia have been used to describe the problems of non-insertional pain associated with this tendon1.

In this blog we will be considering the overuse and inflammatory condition that is associated with Achilles pain, with pronation and supination as main contributory elements.

The biomechanics of the condition starts at heel strike in the gait cycle. After heel strike the foot accelerates into an excessively pronated position and the calcaneus is everted, increased medial tendoachilles traction occurs and may result in transverse shearing of the tendon and sheath, eliciting inflammation and pain.

Achillies Tendonitis

Additional stress is encountered at heel lift as inversion of the calcaneus is assisted by the gastrocnemius and soleus muscles.

Achilles (pain) Tendonitis is similar in its biomechanical action to Plantar Fasciitis in that as the foot pronates, it causes a tractional pull on the attachment and continued Subtalar Joint pronation for any length of time, will allow continuation of the tearing of the sheath. Inflammation and swelling will occur as this continues to takes place.

This action of continual stretching and bending is likened to constant bending of a piece of wire in which the wire heats up in the area of flexion and eventually dips/bends and snaps. The heat generated in the wire is similar to the inflammation that occurs in the Achilles in which inflammation is evidenced when constant stretching and strain occurs. If the patient excessively pronates constantly, the inflammation will be more prominent on the medial side and conversely, supination on the lateral side as the patient strikes with a high strike angle laterally and then proceeds to pronate through midstance, then to toe-off. Inflammation can occur on both sides due to this being the biomechanical pivot point.

The engineering graph below gives an insight into stress studies that have been conducted on building material, however, this principle has been adopted by bio mechanists as they apply it to ‘body engineering’.

Achilles Tendonitis graph.

Looking at the graph we have stress and strain vs time or physiological range. A to B is any material that returns to its shape over a period of time – in this case the stress and strain on the Achilles tendon is associated with abnormal foot function.

B-C is the yield point – the point at which the Achilles tendon is stretched so much that it is unable to return to its original shape. When this transpires inflammation occurs and pain is felt. At this point the patient seeks medical help, and often the symptom is treated, however the biomechanical cause may go untreated. With rest the pain may subside, repetitive stretching of the Achilles tendon will move the condition towards point D, i.e. continual flare up of the Achilles tendon may take place.

Point D is where complete rupture of the tendon may occur or a posterior calcaneal compensatory spur may develop as the body seeks to maintain the attachment.

Changes to the patients’ lifestyle e.g. job change or a new exercise routine may cause additional stress being placed on the biomechanical structure, causing aches and pains to occur in the ankle, knees, hips or even lower back pain. The additional stress on the body will most likely present as pain in an existing area of weakness, and be associated with biomechanical anomalies causing periods of pain and discomfort to occur.

Treatment

The position or point of pain can be a clear indicator of underlying factors. When pain is on the medial side of the Achilles, it is often associated with Subtalar Joint pronation – as it causes the medial aspect of the Achilles tendon attachment to elongate and tear, and will need to be treated with an anti-pronation orthotic.

When the pain is on the lateral side it may be associated with a high forefoot valgus or a high supination angle that causes the lateral attachment to elongate and possibly tear and should be treated with a forefoot valgus addition. If the rearfoot (calcaneus) is flexible a lateral posting can be applied.

Pain in the centre or both sides of the Calcaneal attachment often this is associated with supination at heel strike with ground reaction forces on the lateral side encouraging the foot to move into a pronated position at midstance to toe-off phase of gait. The lateral to medial movement may cause this to be the pivot point of traction of the Achilles tendon and will inflame or flare up the medial and lateral side of the tendon sheath and bursa. Treatment will require both treating both excessive pronation and excessive supination by using orthotic additions attached to the orthotic device to support the arch and address any forefoot valgus deformity.

forefoot valgus addition on ICB sports orthotic

When prescribing orthotics always check for any structural leg length discrepancy, especially if unilateral Achilles pain is being experienced as the longer leg can, as compensation, excessively pronate to level the pelvis.

Repetitive stress and strain on the Achilles over a period of time may cause a posterior calcaneal spur to develop as compensation. Surgical intervention to remove a Posterior Calcaneal Spur can be accomplished without detachment of the Achilles tendon. Successful surgical intervention on a posterior calcaleal spur is more successful than surgery on an Inferior Calcaneal Spur (heel spur).

Additional Treatment Option

• Foot Mobilisations: especially to check if the calcaneus is displaced posteriorly, as this will exert additional traction pressure on the Achilles.

Short term use of a heel lift on both feet (in addition to an orthotic device) to shorten the gastrocnemius muscle and relieve pressure on the Achilles attachment. Do not allow the patient to continue wearing the heel lift for more than 2-3 to reduce Gastrocnemius shortening inflammation should subside in this period of time..


ICB orthotic heel lift

• Acupuncture (or dry needling): at the point of pain can be attempted to reduce to the swelling and inflammation.

• Non steroidal Anti-inflammatory Medication: only in the early stages of the condition.

• Cortisone: is initially effective, however it weakens the ligament structure and it is advised to limit use to one or two occasions. A more conservative approach will be far more beneficial to the patient.

Corticosteroid injections into the region of pain is a common treatment for plantar fasciitis and often Achilles pain. However, such injections have been associated with serious side effects2. Acevedo and Beskin3 reported that in a group of 765 patients with a clinical diagnosis of Plantar Fasciitis, 51 were diagnosed as having a plantar fascia rupture. Of these 51 ruptures, 44 (86%) were associated with corticosteroid injection4. Therefore reliance upon this form of treatment is discouraged for Achilles pain also and a more conservative approach adopted.

Get a FREE Achilles Tendonitis Poster

Free poster-Achillies-Tendonitis

View ICB Products

References

1 Khan KM, Maffulli N. Tendinopathy: An Achilles’ Heel for Athletes and Clinicians. Clin J Sport Med.1998 Jul;8(3):151-42.
2. LEMONT Harvey, DPM. Plantar Fasciitis A Degenerative Process (Fasciosis) Without Inflammation
3.AMMIRATI Krista M. BS, USEN Nsima, MPH May/June 2003, Vol 93, No 3 Journal of the American Podiatric Medical Association
4. ACEVEDO JI, BESKIN JL. Complications of Plantar Fascia Rupture Associated with Corticosteroid Injection. Foot Ankle Int. 1998 Feb;19(2):91-7.

General REFERENCES: BRUNKER, P., & KHAN, K. (1993) Clinical Sports Medicine, Sydney: McGraw-Hill Book Company

Successful Treatment With Orthotics

ICB Lower limb biomechanics

The question is of course: What is regarded as success?

When dealing with Orthotic therapy we are not attempting to heal and often we are not attempting to eradicate the biomechanical issue. Rather we are working within the parameters of a mechanical device to provide the patient with short, mid and long term relief to the pain and discomfort that they are suffering. We also may offer a method to stop an issue progressing to the next level.

Orthotic therapy is NOT a ‘cure all’ for every disease, however, when used in combination with other treatment modalities, can provide improved gait, reduce pain, assist in providing an enhanced quality of life to patients.

View ICB Products

There is a wealth of information attesting to the benefits of orthotic therapy for a wide range of biomechanical conditions, such as:
• Hallux Abducto Valgus (bunions): commonly caused by a short 1st metatarsal shaft and aggravated by excessive pronation.
Ball of foot pain

• Ball of Foot Pain: collapsing and rotating of the metatarsals caused by pronation.

• Plantar Fasciitis & Heel Spur: excess pronation causes the fascia to elongate and tear at the attachment to the calcaneus. An inferior calcaneal spur is a secondary compensation, in which an osseous growth develops at the attachment to secure the fascia.

• Achilles Pain: repetitive over-stretching of the medial and lateral attachments of the Achilles tendon caused by both pronation and or supination, create a point of pain or stress point.
Podiatry and foot anatomy

• Severs Disease (children’s heel pain): related to pronation and growth spurts in children and affects active sporting children more than sedentary ones

• Shin Splints (lateral, medial or an-terior): pronation and supination can be key contributing factors.

• Knee Pain: and collateral ligament strain due to pronatory and supinatory factors and or forefoot anomalies.

• Osgood Schlatters Syndrome (children’s knee pain): occurs due to a combination of tibial torsion, growth spurts and pronation factors.

Knee Pain

Hip Pain: due to structural or functional leg length difference and supination/pronation factors including tight external hip rotators and structural long leg compression into the acetabulum.

Low Back Pain: unilateral and bi-lateral pronation and structural and functional leg length difference causing stress on the lower back L1-L5.

Leg Length Syndrome: when a structural leg length difference is evident the long leg may excessively pronate to level the pelvis.


A report by The American College of Foot & Ankle Orthopaedics & Medicine titled ‘Prescription Custom Foot Orthoses – Practice Guidelines’,1

Gives a wider and more comprehensive array of conditions when in their opinion are able to benefit from the application of prescription orthotic products. The ICB heat mouldable range of orthotics are a simple, cost effective efficient way to treat your patients with customised prescription orthotics and do it right in your own private clinic.

View ICB Products

The quoted report lists

1. Proximal Lower Extremity Pathology: A. Shin Splints, B. Tendonitis (Tenosynovitis), C. Posterior Tibial Dysfunction, D. Chondromalacia Patella (Runner’s Knee, Patellofemoral Syndrome), E. Iliotibial Band Syndrome, F. Limb Length Discrepancy

2. Arthritides: A. Inflammatory Arthritis, B. Rheuma-toid Arthritis, Psoriatic, C. Arthritis, Other Inflammatory Arthritides, D. Osteoarthritis.

3. Mechanically Induced Pain and Deformities: A. Pes Cavus, Haglund’s Deformity , B. Hammer Digit Syndrome, C. Functional Hallux Limitus, Hallux Limitus and Hallux Rigidus, D. Plantar Fasciitis, E. Equinus, F. Sinus Tarsi Syndrome, G. Tailor’s Bunion (Bunionette), H. Hallux Abducto-Valgus (Hallux Valgus, Bunion), I. Pes Planus, J. Metatarsalgia, K. Sesamoiditis, L. Morton’s Neuroma (Intermetatarsal Neuroma).

4. Paediatric Conditions: A. Calcaneal Apophysitis, B. Genu Varum and Genu Valgum, C. Tarsal Coalition, D. Metatarsus Adductus.

The issue of success is really not in question, rather when where and how to use orthotics to benefit the patient is!

There are then 3 main questions regarding orthotic therapy to ask when treating patients and these are :

1. Does the patient present with a condition that has been reported to be successfully treated with orthotics?

2. Does the patient present with asymptomatic lower limb biomechanical anomalies or faulty foot mechanics? The patient can also be presented with orthotics as a preventative or prophylactic treatment.

3. Will the support and stabilisation offered by orthotic therapy enhance the overall treatment outcome? This is a personal, clinical determination to be made by the practitioner.

A consideration is:
The cost of prefabricated heat mouldable foot orthoses is relatively low, and the adverse effects of using foot orthoses are minor. (see below 2,3).

There are 3 key starter steps in orthotic therapy:

Check for pronation and supination

SAVE 10% OFF ICB PRODUCTS WITH DISCOUNT CODE: 02ICB10 Offer online only!View ICB Products

References:

1. The American College of Foot & Ankle Orthopedics & Medicine. Prescription Custom Foot Orthoses – Practice Guidelines, December, 2006

2. COLLINS N, BISSET L, MCPOIL T, VICENZINO B. Foot Orthoses in Lower Limb Overuse Conditions: A Systematic Review and Meta-analysis. Foot Ankle Int. 2007;28(3):396-412.

3. RICHTER, Randy R. PhD, PT; AUSTIN, Tricia M. , PhD, PT, ATC; REINKING Mark F. , PhD, PT, ATC, SCS. Foot Orthoses in Lower Limb Overuse Conditions: A Systematic Review and MetaAnaiysis— Critical Appraisal and Commentary

Heel Pain Management Pathway

Heel Pain Management

Heel pain can be unpredictable and occasionally problematic to resolve. So we teamed up with Healthy Step to produce a heel pain pathway to pain free heels.

The HeelFixKit is the most innovative and cost effective approach available in the management and treatment of heel pain, plantar fasciitis and heel spurs. The HeelFixKit contains specially designed Insoles, Therapy Balls, Heel Tape & Heel Cups. Developed by a British Musculoskeletal Podiatrist, Andy Horwood, the pack is designed to allow you to treat your heel yourself and make dramatic improvements in just six weeks.

HeelFixKit for heel pain

By combining insoles, taping, stretching and strengthening the foot, a treatment programme is initiated that treats the heel pain holistically. The treatment regime not only helps settle the pain but also prevent the re-occurrence of heel pain, and its all achieved at home. the kit is £14.95 ex vat for trade and RRP: £34.95.

View HeelFixKit on DLT

How to make the most of your HeelFixKit

The heel fix kit comes with an exercise information sheet, as the exercises are essential to improving the pain and returning to activity.

Heel Pain Pathway – Help your patient with their pain with: 

• Downloadable heel pain pathway flow chart
• Exercise Videos to share on social media
• Downloadable heel pain sheet

Below is a printable self-help flow chart for your patients to help support their heel pain.
Print the large version here: A2-Heel-Pain-Pathway

Heel Pain Pathway Download

See the videos below for exercises that you can share and send to your patients.

Foot Therapy Ball –
Simple exercises to help strengthen your feet:

Stair calf exercise for non-insertional achilles tendinopathy.

An easy 3 step exercise to help strengthen your feet

Your patient can use this handy Pain Sheet to reassess their pain level every two weeks while following the advice on this pathway below. Print the large version here 32-Week-Pain-scale-1

Heel Pain Sheet

View HeelFixKit on DLT


Plantar Fascial Groove

ICB Lower limb biomechanics

Arch pain when wearing orthotics can be problematic as it often encourages patients to ‘give up’ on orthotic therapy.

The Plantar Fascia is a fibrous tissue that does not exhibit the capacity to stretch or elongate and so often the fascia presses onto the arch of the orthotic causing discomfort.

View ICB Products

The fascia assists in maintaining the longitudinal arch shape, however, can be an issue when it presents as a short fascia or excessively protruding fascia.

Image show Plantar fascial drop occurring at the 1st MTPJ performs the windlass mechanism during toe off phase of gait.

Inflammation and tearing at the heel bone

A tight fascia can also contribute to plantar fasciitis and heel spur syndrome due to the tension on the attachment at the calcaneus.

A Plantar fascial groove can be used when the plantar fascia is very tight or the patient indicates that the arch of the orthotic is causing pressure in the arch area.

Fascia Position

Generally the plantar fascia position on the orthotic device is located approximately 1 cm lateral to the medial boarder of the orthotic device.

The ICB orthotic can be easily modified using a heat gun to heat the area to be deflected.

ICB Heat Gun

The groove can be made using metal scissors or another similar item.

ICB Orthotic

When making the groove ensure that the heat is applied only to the plantar fascia position on the orthotic device to reduce any unwanted distortion of the EVA material.

For a more permanent solution the groove can be placed into the orthotic device using either a bench grinder or Dremel hand grinder.

ICB Orthotic For Heel Pain

The groove is created 1 cm from the medial aspect and runs the length of the arch of the orthotic device.

If the patient is suffering significant pain we advise the following step by step procedure to pain relief.

The first step would be to place a plantar fascial groove as this will allow the fascia a plantar drop and take pressure off the fascia.

Grind Orthotic

If pain persists due to the arch collapsing on the arch of the orthotic use a bilateral Rearfoot Inversion addition which will reduce elongation of the fascia by inverting the rearfoot .

ICB Orthotic Rearfoot Varus

If further adjustment is required a 1st Ray cut away or 1st MPTJ deflection will be required to reduce tension on the fascia.

Both 2/3 and Full Length deflections work effectively in reducing the tension on the fascia.

ICB orthotic

Orthotic therapy is one in which some minor adjustment may be needed when treating patients.

View ICB Products

SAVE 10% OFF ICB PRODUCTS WITH DISCOUNT CODE: 02ICB10 Offer online only!


Orthotic Therapy for Metatarsal Pain

ICB Lower limb biomechanics

Orthotic therapy often is a therapy which involves some adjustment to the prescription of the treatment device. The therapy, rather than being a ‘one size fits all’ approach is one which requires working with the patient to get the desired result.

By that we mean that different conditions will require different treatment approaches and different orthotic prescriptions to meet patient expectations and to provide required results.

Orthotic devices are mechanical devices and often an alternative approach is required due to shoe styles and other issues which impede the treatment process.

One such issue is problematic movement of additions and in this instance the metatarsal dome placement on the orthotic device.

Issues that are most prevalent are:

1) Placement on the orthotic

2) Positioning of the dome in relationship to the patients foot.

3) Soft and firm domes which to use?

4) Movement of the dome.

Usually ‘met’ domes are adhered to the dorsal surface of the orthotic.

We advise that the distal edge of the dome should approximately 5mm forward to the distal edge of the orthotic device.

The positioning will lift the metatarsal shafts and not impinge on the metatarsal joints during toe off phase.

ICB Orthotic Dome Adjustment

When using a Full length device practitioners will need to establish where the orthotic ‘distal’ edge sits on the orthotic device .

In this case just fold back the forefoot of the Full length to reveal the position of the bisection of the 1st MTPJ.

ICB Orthotic Dome Adjustment

Soft as opposed to Firm domes can be a matter of preference, however, if correctly positioned the patient will not find the firm domes uncomfortable to wear.

Positioning should be an outcome of the type of issues the patient present with, such as, pain or discomfort between 3rd & 4th or 2nd and 3rd met heads. Often a temporary placement is beneficial as the position can be adjusted until the patient feels that they are happy with the position. If the 3M tape is not sufficient to hold the dome in position then a more permanent fixing can be achieved with glue such as a spray glue.

Glue for Orthotics

Often patients complain that the metatarsal dome addition has a tendency to peel off the dorsal surface due to getting caught on their socks as they place their foot into the shoe.

Orthotic dome

View ICB Products

The remedy for this issue is to create an ‘intrinsic’ metatarsal dome, that is, create the metatarsal dome in the actual orthotic device– Intrinsic—built in or become part of the device. 

Completing the intrinsic dome modification will remove the likelihood of the addition peeling off or getting caught on the patients sock.

ICB orthotics are 100% EVA material which moulds well under heat and is highly adaptable.  To effect this adjustment practitioners will need to establish the position on the patients foot where the metatarsal dome is to be positioned.

Podiatry and Orthotics

Place the correct size Dome—Small for small foot Large for Large foot on the Plantar surface of the orthotic and draw the shape of the dome.

Orthotic adjustment with Heat

Remove the Dome and using a Heat gun apply heat to area that you wish to deflect.

Next place the FIRM dome on a hard flat surface and position the orthotic on top in the correct position for moulding.

Orthotics ICB

Once you are able to see the shape of the dome you can apply 3M tape to the dorsal surface of the dome in readiness to apply to the plantar surface of the orthotic.

At this point a decision can be made as to whether you wish to use the firm dome OR another material such as felt or poron to infill and maintain the shape of the in-built dome.
Poron For Orthotic

The shape can be cut and glued into the cavity and then ground flat on the base for the best fit.

Orthotic Dome

View ICB Products

To heat or not to heat an orthotic?

ICB Lower limb biomechanics

Often practitioners ask if there is really any reason that they should bother heating and moulding the ICB orthotic product.

Whilst the product can be used directly out of the presentation pack and placed into the shoe, heat moulding provides an added dimension in maximising patient compliance.


View ICB Products

Generally we recommend that upon observation if the rearfoot position is lower than +3° or greater than +6° heat moulding will definitely benefit the patient. The ICB product exhibits a 5° rearfoot varus Intrinsic angle to assist in realignment of the calcaneus.
Orthotics Heat Moulding

When treating rearfoot greater than 5° – 6° will be beneficial and for more pes planus foot types reducing the average 42° arch height will provide more comfort for the patient.

Measuring Orthotics

When a deflection is required to deflect around a callus etc. practitioners can use a spoon to make a deflection directly in the product.

Heating Orthotics

Often practitioners have to deal with highly unusual foot issues and the use of an adaptable heat mouldable product can be extremely helpful. Product should be chosen with the mindset that they have the capability to be modified and when the situation arises they then have the tools to perform that particular function for the patient.

Orthotics

The moulding above may seem extreme , however this product was actually customised for a patient in Asia.

The patient suffered an injury and the foot was set in a particular position which created a functional right long leg.

Fitting an orthotic

The patient refused further surgery and requested conservative treatment. This extreme moulding was combined with shoe wear that had a large heel height such as a boot to provide the desired result for the patient.

Practitioners are encouraged to experiment and use alternate methods of moulding to the patients foot shape. One such method is pictured, the foot and orthotic is wrapped in a bandage in the ideal or STJN position due to the patients inability to weight bear.

foot and orthotic is wrapped in a bandage

Difficulty can be experience when treating children and so alternate moulding methods should be experimented with in an endeavour to be able to treat the entire patient base.

Issues with treating children and heat moulding can be overcome by using a non weight bearing moulding method as seen below.

Childrens Orthotics

This non weight bearing method can be very effective. The use of the Anterior Alignment Method for ideal or STJN is recommended to establish positioning.

The ICB normal method of moulding is in weight bearing position, however, alternate methods can be used to treat patients whilst maintaining the patients ideal position.

Generally product that does NOT have a material cover can be heated on the dorsal and plantar surface, whereas with covered product such as, seen below , should only be heated on the plantar surface to avoid burning the material cover.

ICB Orthotics

A recent development in the ICB product is the reduction in the heat time that is required to attain the optimum level of elasticity in the EVA material.

Close observation to the heating process is necessary to produce a well moulded product. Re-moulding is possible with the ICB Heat mouldable product, albeit with some loss of density integrity in which 5-7% softening of the molecular structure will be experienced on the re-heating of the product.

To start maintain the heat gun at a distance of approx. 10-15cm. The heating process commences by using 3 circular motions on the plantar surface located in the medial arch area concentrating on the words RIGHT & LEFT and then a further circular motion on the plantar heel area.

Heat Moulding Orthotics

Continue until the words RIGHT and LEFT tart to Melt indicating that the thermal heat level has been attained.

Orthotics in shoes

Request that the patient inserts the UN HEATED product in their shoe as this will provide foundational stability and avoid causing a functional leg length.

Next remove any factory fitted shoe innersole and place the heated product in the shoe.

Orthotics in shoes

Place the foot to be moulded in the ideal or neutral position using the Anterior Alignment method and Talo Navicular method.

Maintain for 30-40 seconds. Then remove the product and allow to cool down approx. 1-2 minutes and commence the procedure again for the alternate foot.

View ICB Products


Creating a Plantarflexed 1st Deflection

ICB Lower limb biomechanics

Often the orthotic device requires some adjustment to suit the patient and assist in alleviating the pain that they may be suffering.


View ICB Products

One such deflection is a plantarflexed 1st or 1st Ray (metatarsal) cut away deflection.
ICB Orthotic

A plantarflexed 1st metatarsal phalangeal joint (MTPJ) sits plantarflexed to the lesser metatarsals and can be a fixed osseous or mobile condition which can result in the patient suffering from Sesamoiditis (inflammation or bifurcation of the sesamoid apparatus). A supinated foot position and forefoot Valgus can often accompany this condition.


Sesamoiditis

Sesamoiditis – impingement of the Sesamoid apparatusTo assess for a plantarflexed 1st place the foot in the neutral and take hold of the lesser metatarsals (2nd to 5th). Using the thumb and pointer finger to grip the 1st MTPJ and lesser metatarsals – the amount of dorsiflexion and plantarflexion should be 5mm up and 5mm down from the axis of the lesser metatarsals.

Plantarflexed Assesment

Plantarflexed 1st assessment

The image (above) indicates a mobile plantarflexed 1st, having limited dorsiflexion with significant plantarflexion.

If the joint will not move then it is a fixed Plantarflexed 1st, meaning that there is no dorsiflexion or it is minimal, and that it sits in a fixed plantarflexed position.

Treatment for a Fixed Plantarflexed 1st will be a ‘1st ray cut away’ deflection created in the orthotic which will provide 1st metatarsal relief and support to the lesser metatarsals.

Plantarflexted 1st deflection

Creating a 2/3 or ¾ length cut away

1st metatarsal Phalengeal joint

Step 1
Place the device on the base of the foot and draw an arc around the 1st metatarsal Phalengeal joint sits.

Step 2
Ensure that the 1st MTPJ is free to plantarflex and grind or linish the orthotic so that the contour is comfortable for the patient by using a hand grinder or bench grinder.

ICB Orthotic Grinder

Some time the amount of support provided by the orthotic under the lesser metatarsals is insufficient and the patient will continue to feel pain under the 1st MTPJ. In this case more support may need to be affixed to the transverse arch of the orthotic to support the lesser metatarsals.

To increase support in the transverse arch, measure the difference between the axis of the lesser metatarsals and the 1st MTPJ, then add a forefoot addition wedge to the orthotic to support the lesser metatarsals. The forefoot addition should be positioned with the thickest side to-wards the distal edge of the orthotic.

ICB Orthotic Addition

To assess the amount of additional support required when the 1st MTPJ is mobile, if for example the measurement is 8mm in plantarflexion and 2mm dorsiflexion to the lesser metatarsals, subtract the 2mm from the 8mm, thus providing the required amount of support – in this case 6mm or 6°.

plantarflexion

This type of orthotic adjustment is called a ‘2-5 Metatarsal Bar’, which can effectively decrease pressure on the metatarsal heads by supporting the metatarsal shafts.

When modifying a Full Length orthotic product to create a 1st ray trench follow the steps below:

Step 1
Mark out the width of the trench by placing the foot of the orthotic and scribing a line between the Hallux and the 2nd Phalange.

Using Orthotics

posterior position of the 1st MTPJ

Step 2
Mark the line on an angle to allow the posterior position of the 1st MTPJ to be unimpeded by the orthotic arch.


Working with ICB Orthotics

Step 3
Place the device on a firm surface when grinding with a Dremel Hand grinder and remove the eva material leaving 1mm on the plantar surface and remove excess material behind the 1st MTP Joint.


View ICB Products

SAVE 10% OFF ICB PRODUCTS WITH DISCOUNT CODE: 02ICB10 Offer online only!